


DIY a Mini Christmas Tree Ornament: A Fun Holiday Craft for Parents and Kids
The holiday season is the perfect time to slow down, get cozy, and create beautiful memories together. One of the best ways to do that is by making DIY Christmas ornaments filled with love, laughter, and creativity.
This Mini Christmas Tree Ornament craft is specially designed for parents and kids (ages 5–12) to enjoy together. It’s simple, safe, creative, and most importantly, screen-free fun that brings families closer during the festive season.
So gather your crafting supplies, put on some Christmas music, and turn a regular afternoon into a joyful holiday moment.
Why DIY Christmas Ornaments Are So Special for Families
DIY Christmas ornaments are more than just decorations. They tell a story.
When kids create ornaments with their own hands, they feel proud. When parents craft alongside them, they build connection. Every year, when you hang these ornaments on the tree, you’ll remember the giggles, the gluey fingers, and the joy of creating together.
Here’s why families love holiday crafting:
- Encourages creativity and imagination
- Builds fine motor skills for kids
- Creates meaningful bonding time
- Reduces screen time during holidays
- Turns decorations into keepsakes
Best of all, this craft is easy enough for kids and fun enough for parents too.
Materials Needed
Before you begin, gather everything on a clean table. This is also a great moment to let kids help organize the supplies.
You’ll need:
- Felt
- Scissors
- Glue
- Cotton
- Hanging string or ribbon
- Star decoration
- Snowflakes
- Colorful rhinestones
Tip: Lay down old newspapers or a craft mat to keep things tidy.
Step-by-Step Guide: DIY a Mini Christmas Tree Ornament
Let’s build your mini Christmas tree ornament step by step. Take your time and enjoy the process. There’s no right or wrong way to decorate.
Step 1: Sketch a Christmas Tree Shape on Felt
Start by drawing a simple Christmas tree shape on your felt.
- Think of a triangle with soft, wavy edges
- Keep it about palm-sized for easy handling
- Parents can draw the outline for younger kids
Kid tip: Imagine drawing a pine tree from a storybook.
Step 2: Cut Out the Tree Shapes
Cut out two identical tree shapes from the felt.
- One will be the front
- One will be the back
If your child is younger, parents should handle cutting while kids can help hold the felt or choose colors.
For older kids (ages 8–12), allow them to cut with safety scissors under supervision.
Step 3: Thread the Hanging String
Before gluing the pieces together, prepare the hanger.
- Cut a short piece of string or ribbon
- Fold it into a loop
- Place the ends between the two tree shapes at the top
This allows your ornament to hang perfectly on the Christmas tree later.
Step 4: Glue the Edges Together
Apply glue carefully around the edges of one felt tree.
- Press the second tree on top
- Leave a small opening at the side or bottom
Make sure the hanging string stays inside and secure.
Patience tip: Hold it gently for a few seconds so the glue sets properly.
Step 5: Fill the Tree with Soft Cotton
Now comes the fun part.
- Gently push cotton through the opening
- Fill it just enough to make it soft and puffy
- Avoid overfilling so the ornament hangs well
Once done, glue the opening closed.
Kids especially enjoy this step because it feels like stuffing a tiny pillow.
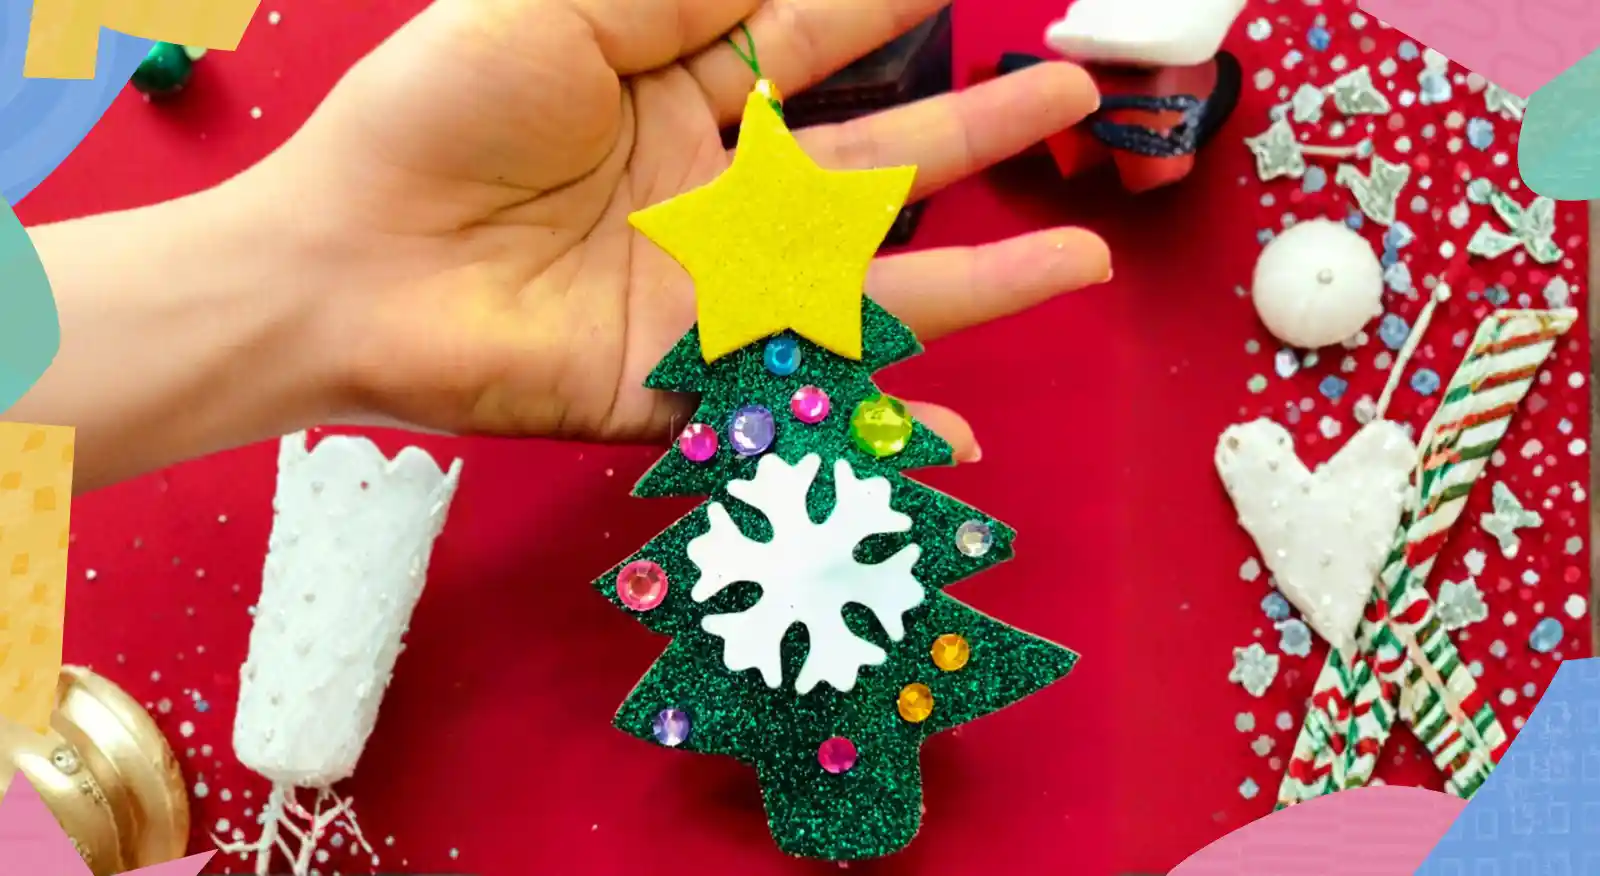
Step 6: Glue the Star on Top
Every Christmas tree needs a star.
- Place the star decoration at the top of your felt tree
- Add a small dot of glue
- Press gently and let it set
This is a great moment to talk with kids about holiday traditions and symbols.
Step 7: Stick on Snowflakes for a Festive Touch
Now it’s time to decorate.
- Add snowflake stickers or felt cut-outs
- Spread them evenly or cluster them creatively
- Let kids decide the design
There’s no wrong placement. Every ornament is unique.
Step 8: Cover with Colorful Rhinestones
This is often everyone’s favorite step.
- Add colorful rhinestones across the tree
- Use small dots of glue to secure them
- Mix sizes and colors for extra sparkle
Bling — festive vibes fully unlocked.
Allow the ornament to dry completely before hanging it.
Safety Tips for Parents
Crafting should always be fun and safe. Keep these simple reminders in mind:
- Scissors:
- Use child-safe scissors
- Parents should cut tricky or detailed areas
- Glue:
- Choose non-toxic, child-safe glue
- Supervise younger kids closely
- Age-appropriate tasks:
- Ages 5–6: decorating and cotton filling
- Ages 7–9: gluing and simple cutting
- Ages 10–12: full craft with guidance
Crafting together is the best safety rule of all.
Creative Variations & Fun Ideas
Want to take this craft to the next level? Try these creative twists.
Color Themes
- Classic green, red, and gold
- Pastel Christmas tones
- Winter-inspired blue and silver
Personalization Ideas
- Write your child’s name with fabric markers
- Add the year for a memory keepsake
- Create patterns using glitter glue
Make It a Gift
- Create multiple ornaments in one session
- Gift them to grandparents, teachers, or friends
- Attach a handwritten holiday message
Family tip: Make one ornament every year and watch your collection grow.
Your Mini Christmas Tree Ornament Is Complete
Take a moment to admire your finished ornament.
It’s not just a decoration. It’s a memory made by little hands and big hearts. Hang it proudly on your Christmas tree, doorway, or even in your child’s bedroom.
Each time you see it, you’ll remember the laughter, teamwork, and holiday joy shared together.
Ready to Start a New Holiday Tradition?
Crafting together is one of the most meaningful gifts you can give your child.
Try this DIY Mini Christmas Tree Ornament today.
Make it a yearly family tradition.
Share photos with loved ones.
Celebrate creativity, bonding, and festive joy.
Gather your family, grab your felt and glue, and let the holiday magic begin — one handmade ornament at a time.
Frequently Asked Questions (FAQ)
- What age is this DIY mini Christmas tree ornament suitable for?
This craft is ideal for children aged 5 to 12. Younger kids can focus on decorating and cotton filling, while older kids can help with cutting and assembling under adult supervision.
- Is this Christmas ornament craft safe for kids?
Yes, it is safe when parents supervise. Use child-safe scissors and non-toxic glue. Adults should assist with cutting and gluing for younger children.
- How long does it take to make one mini Christmas tree ornament?
Each ornament usually takes about 20 to 30 minutes, depending on how detailed the decorations are. It’s a perfect short holiday activity for families.
- Can we make these ornaments as Christmas gifts?
Absolutely. These handmade ornaments make thoughtful gifts for grandparents, teachers, friends, and relatives. Adding names or the year makes them even more special.
- What materials can I use if I don’t have felt?
If felt is unavailable, you can use thick fabric, foam sheets, or even recycled fabric from old clothes. The key is using a material that holds shape and is easy to decorate.